The Hidden Frustration Behind the Screen
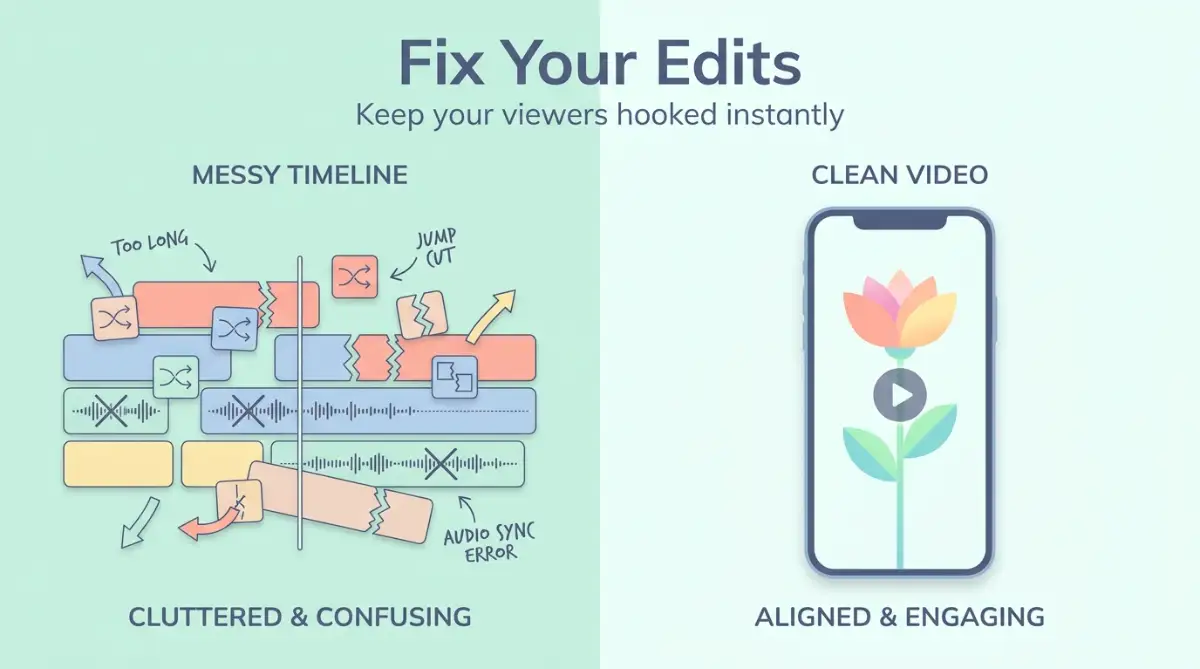
Upload. Wait. Zero views. We have all been trapped in that frustrating cycle. You easily spend four hours editing a 15-second clip, only to realize the app completely covered your text with a giant white heart icon. Before you delete your account out of pure embarrassment, stop and take a breath.
Getting people to stop scrolling has nothing to do with your personality, your camera, or the clothes you wear. It almost always boils down to a few invisible rules of mobile editing that you are breaking without even knowing it. Let us fix those mistakes right now so your hard work actually gets the attention it deserves.
What You Will Fix Today:
- The Safe Zone Rule: Stop hiding your best text behind share buttons.
- The 3-Second Hook: Why saying "Hey guys" is killing your reach.
- Audio Trumps Video: How simple sound design keeps thumbs from swiping.
- The 1080p Sweet Spot: Stop uploading bulky 4K files that apps compress and destroy.
Decoding the Psychology of the Endless Scroll
Before we can fix your edits, we need to understand exactly how the modern internet user actually behaves. People do not open their social media apps to learn complex theories or watch long, slow introductions. They open these apps to be entertained, distracted, or quickly educated while waiting in line at the grocery store.
When a viewer lands on your video, they are holding their thumb just millimeters away from the screen, ready to swipe up. You are fighting against every single distraction in their life, from crying babies to boiling pots on the stove. This means your video editing needs to act like a magnet, constantly pulling their attention back to the center of the screen.
If there is even one second of dead silence, the viewer's brain instantly registers boredom. They will not wait for you to clear your throat or take a deep breath before you start speaking. This is exactly why mastering the art of the edit is the most powerful skill you can learn today.
Myth vs Reality in Content Creation
To make things perfectly clear, let us look at some common misunderstandings about making videos. Many beginners fall into these traps and end up wasting their precious energy on the wrong things.
As you can see, keeping things simple and organized is the true secret to keeping people watching. Now, let us break down the exact steps you need to take to transform your raw clips into highly engaging content.
Setting the Perfect Foundation: Framing and Safe Zones
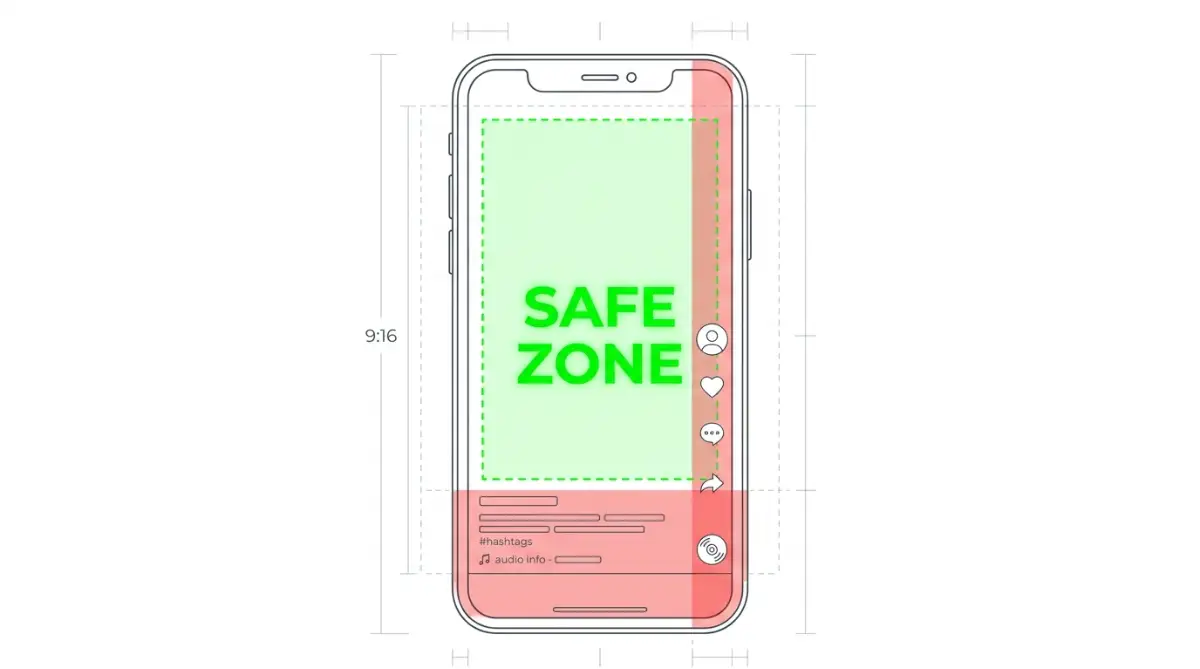
The biggest mistake you can make happens before you even add your first transition. It is all about how your video physically fits inside the viewer's screen. Vertical videos use a specific 9:16 aspect ratio, which means the screen is much taller than it is wide.
If you try to edit a wide video into a tall space without adjusting it, you will end up with huge, ugly black bars on the top and bottom. This instantly tells the viewer that your content is low quality or recycled from somewhere else. You must always edit your project in the correct 9:16 format from the very beginning.
More importantly, every single app has hidden "danger zones" where they place their own buttons. The right side of the screen usually holds the like, comment, and share buttons. The bottom area is packed with your username, the video caption, and the music track details.
If you put your important text or your face in these zones, they will be completely blocked. Your viewers will get frustrated trying to read text that is covered by a big white heart icon. Always keep your main subjects and text right in the middle of the screen, creating a clean "safe zone" for your audience.
The Art of the Hook: Winning the First Three Seconds
The first three seconds of your video will completely decide its fate. If you fail to grab attention instantly, the rest of your amazing edit will never be seen by anyone. You cannot start your video by saying, "Hey guys, welcome back to my page, today we are going to talk about..."
By the time you finish saying "Hey guys," the viewer is already watching someone else's video. You need to start directly in the middle of the action or drop a bold statement immediately. Visually, your editing needs to support this aggressive start.
Use a sudden movement, a change of scenery, or a large pop-up text to reset the viewer's brain. You want to make them think, "Wait, what is happening here?" This small moment of curiosity is exactly what stops the thumb from swiping away.
My Personal Realization on Pacing
I used to leave a tiny fraction of a second at the beginning of my clips where I was just staring at the lens, getting ready to speak. Pro Tip: I finally realized that manually trimming out every single deep breath, pause, and "umm" from my audio made my videos feel ten times faster and more professional. You do not need to sound like a fast-talking robot, but you must completely eliminate any dead air that does not add value to your story.
Sound Design: The Invisible Magnet
Many creators spend hours making their footage look beautiful but completely ignore how their video sounds. Believe it or not, bad audio will make people swipe away much faster than bad video quality. If there is a loud background hum, wind noise, or echo, the viewer's brain gets annoyed very quickly.
You do not need to buy an expensive microphone right away. Just edit your audio to remove the background noise using built-in noise reduction tools found in most editing apps. Make sure your voice is loud, clear, and perfectly synced with your mouth movements.
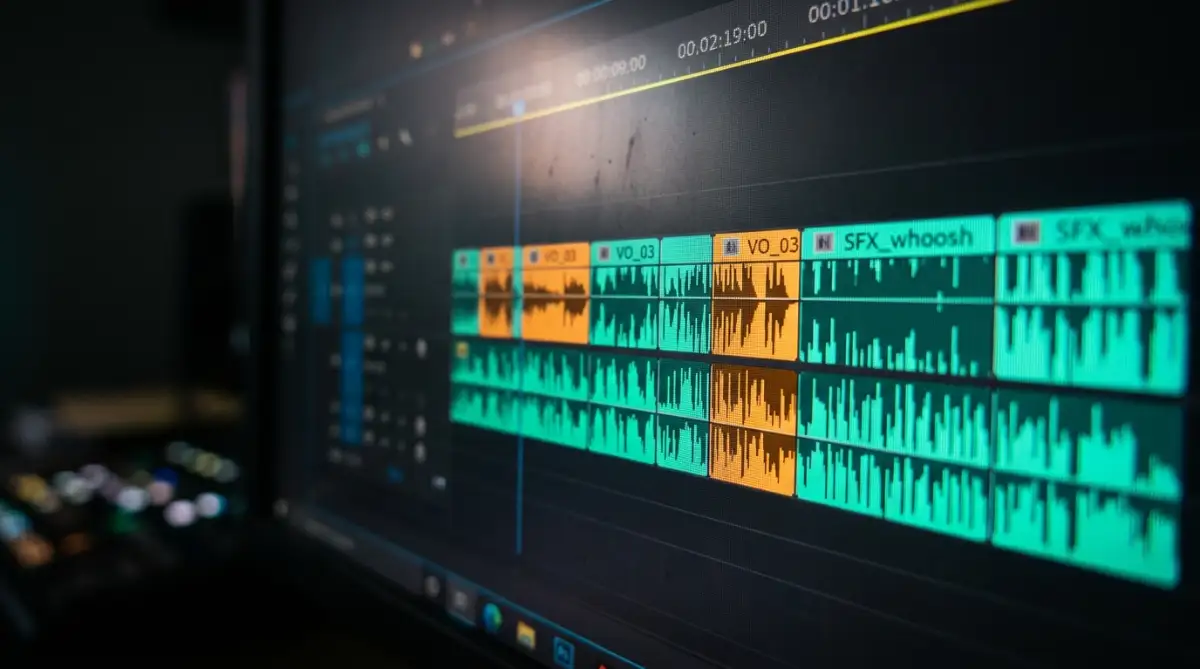
But sound design goes far beyond just hearing your voice clearly. You should actively use subtle sound effects to make your visual edits feel more physical and real. When a piece of text pops up on the screen, add a soft "whoosh" or "pop" sound to match the movement.
These tiny audio cues trick the brain into paying closer attention to the screen. It is like adding seasoning to a plain meal; it makes the entire experience much more enjoyable. Just be careful not to make the sound effects louder than your actual speaking voice.
Pro-Mixer Audio Hack:
If you are confused about how loud your sounds should actually be, check the audio meter in your editing app. Keep your main speaking voice bouncing around -6dB to -3dB. Set your background music all the way down to -18dB or -20dB, and put those tiny "whoosh" sound effects at -10dB. This simple math keeps everything perfectly balanced without hurting anyone's ears.
How Sound Keeps the Viewer Awake:
Below is a great visual breakdown of why audio design matters so much in modern video editing. If you struggle with keeping your viewers engaged, paying attention to the background music and sound effects will change everything for you.
Using B-Roll to Tell a Better Story
Watching one person speak directly into the camera for sixty seconds can get a little boring, no matter how interesting the topic is. This is where the magic of B-roll comes into play. B-roll simply refers to extra video clips that you show on the screen while your voice continues playing in the background.
For example, if you are talking about making a cup of coffee, do not just tell the viewer about it. Show a tight, close-up clip of the dark espresso pouring into the cup while you explain the process. This keeps the eyes busy and gives the brain new information to process.
You should aim to change the visual element on your screen every three to five seconds. This does not mean you need crazy flashing lights or extreme camera spins. A simple zoom in, a new angle, or a short B-roll clip will naturally refresh the viewer's attention span.
Think of your video like a beautifully illustrated children's book. You want to provide a new picture for every new idea you introduce. This visual variety makes your content feel incredibly professional and well thought out.
The Secret Power of Dynamic Captions
Did you know that a massive percentage of people watch short videos with their phone completely on silent? They might be sitting on a crowded train, hiding in the back of a classroom, or laying in bed next to a sleeping partner. If your video relies entirely on audio, you are automatically losing half of your potential audience.
Adding text captions to the middle of your screen is no longer just a nice bonus; it is an absolute requirement. But you should not just slap a huge block of small text at the bottom of the video. People do not want to read an essay while they are trying to watch your facial expressions.
Instead, use dynamic, animated captions that highlight only one or two words at a time. Make the most important words stand out by changing their color to a bright yellow or green. This forces the viewer's eyes to follow along with the text exactly as you speak it.
When their eyes are locked onto your changing text, they are much less likely to notice the time passing. This simple editing trick can massively increase your average watch time, which tells the algorithms to push your video to even more people.
Perfecting Your Color and Lighting in Post-Production
Even if you record your video in a somewhat dark room, you can still save the footage during the editing phase. Every good editing app has a section for adjusting your brightness, contrast, and color saturation. You do not need to be a Hollywood colorist to make your video pop.
Start by slightly increasing the brightness and exposure to make the entire scene feel more welcoming. Then, bump up the contrast just a little bit to remove that foggy, washed-out look from your phone camera. Finally, add a touch of saturation to make your skin tones look healthy and natural.
However, you must avoid the temptation of pushing the settings too far. If your face looks like a glowing orange tomato, people will find it extremely weird and swipe away. The goal of color editing is simply to make reality look a little bit brighter and cleaner, not to create a fake, plastic world.
You should always check how your video looks when your phone brightness is turned down to fifty percent. This is how most normal people actually look at their screens indoors. If your edit is too dark to see at medium brightness, you definitely need to increase your exposure settings.
Navigating Export Settings Without Losing Quality
There is nothing more heartbreaking than spending hours creating a beautiful, crisp video, only to have it look like a blurry mess after you upload it. This usually happens because your export settings are completely mismatched with the social media platform's rules. More pixels do not always mean a better final result.
Many beginners try to export their vertical videos in massive 4K resolution, thinking it will look the best. But most social media apps actually struggle to process files that are this large and heavy. To save space on their servers, the apps will forcefully compress your massive 4K file, ruining the quality in the process.
The sweet spot for almost all vertical video platforms is standard 1080p resolution at 30 or 60 frames per second. This file size is perfectly optimized for phone screens and uploads incredibly fast over normal Wi-Fi connections. It allows the app to maintain your crisp edges without heavily compressing the data.
If you are ever in doubt about these numbers, you can always double-check the official YouTube Encoding Specifications. That link goes straight to Google's permanent support page, so you can see the exact formatting guidelines straight from the source without guessing.
Here is a quick cheat sheet for the exact export settings you should use depending on where you post. I keep this written on a sticky note next to my monitor:
You also need to make sure you are turning on the "High-Quality Upload" setting deep inside the menus of your specific social media apps. Sometimes, these apps will default to low quality if you are using mobile data instead of a strong home network. Taking three seconds to check these hidden settings will save all the hard work you did in the editing room.
Staying Organized to Prevent Burnout
Editing can quickly become an overwhelming mess if you do not have a system in place. When you have fifty different raw clips sitting in your camera roll, finding the right one feels like searching for a needle in a haystack. This lack of organization is exactly what causes creators to burn out and quit altogether.
Before you even open your editing application, take five minutes to go through your camera roll. Delete all the bad takes, blurry shots, and mistakes immediately. Only keep the absolute best versions of the clips you actually plan to use.
You can even favorite these clips or put them into a specific folder on your phone named after your project. When you finally open your editing software, you will only see the clean, usable footage. This tiny organizational habit will easily cut your total editing time in half and make the process actually feel fun again.
Pushing the Boundaries: Next-Level Editing Secrets
Once you master the basic rules of framing and sound design, you are ready to step into the big leagues. The most successful creators do not just randomly cut their clips together and hope for the best. They use specific psychological triggers in their editing timeline to keep the human brain fully engaged.
One of the most powerful strategies you can use is called the "seamless loop." This is a brilliant editing trick that tricks the social media algorithm into playing your video multiple times. The concept is incredibly simple but requires a little bit of planning before you hit record.
You simply script your very last sentence so that it flows perfectly into your opening hook. For example, your video might start with the phrase, "...the easiest way to edit faster." Then, at the very end of your video, you say, "And if you want to save time, this is..."
When the app naturally repeats your video, the viewer hears one complete, unbroken sentence. "And if you want to save time, this is the easiest way to edit faster." Most people will watch the first few seconds of the loop without even realizing the video has restarted. This massively boosts your completion rate, telling the algorithm your content is highly addictive.
Mastering the Art of Micro-Pacing
Another secret weapon used by professionals is something I like to call micro-pacing. Normal human conversations have natural pauses, deep breaths, and moments where we search for the right word. But on a vertical screen, those tiny moments of silence feel like hours to a scrolling viewer.
You need to zoom closely into your editing timeline and cut out those micro-seconds of dead air. The audio waves on your screen should look completely packed together, jumping from one thought to the next. According to researchers studying how the human brain processes visual information, people can register an image in as little as 13 milliseconds.
This means you do not have to wait for the viewer to catch up to your thoughts. They are processing your message much faster than you think they are. By tightening up your cuts, your video feels highly energetic and almost impossible to click away from.
Leveraging Artificial Intelligence for Background Visuals
Sometimes you simply do not have the right video clips to show on the screen while you are talking. This is where generating custom digital assets can save your entire project. You can use modern tools to create stunning background images that perfectly match the topic you are explaining.
However, you must be extremely careful with the quality of these generated graphics. If you do not know why your AI images look blurry and how to fix them fast, your video will instantly look cheap and unprofessional. Your audience expects crisp, high-definition visuals every single time they watch your content.
You also need to make sure the elements inside those generated images look completely normal and natural. If you are showing an artificial graphic of a person pointing at a whiteboard, pay close attention to the details. You might need a solid guide on how to fix deformed AI hands and faces before you insert that picture into your video timeline.
Quick AI Fixes: Ask the Editor
- Question: Why do my AI generated backgrounds look so fake on mobile?
- Answer: You are probably ignoring depth of field. Always apply a slight blur to your AI background so you remain the sharpest object in the front.
- Question: What is the fastest way to fix weird AI fingers?
- Answer: Crop them out! If the hands look strange, just zoom the picture in by 15%. No one will ever notice they are missing.
Building a Long-Term Consistency System
Editing one amazing video is a great achievement, but it will not grow your account by itself. The algorithms heavily reward creators who can publish high-quality content on a regular, predictable schedule. But editing a new video every single day will quickly destroy your energy and lead to massive creative burnout.
To survive this game, you must adopt a batch-creation strategy immediately. Instead of filming and editing one video on Monday, sit down on Sunday afternoon and prepare five videos all at once. You can set up your lights, your microphone, and your camera just a single time.
Once the filming is done, you can dump all the footage onto your computer or phone and edit everything in one sitting. You will naturally edit much faster when you are in the zone, skipping the slow setup process. By the end of the day, you have a whole week of content ready to be scheduled and published.
This takes the daily pressure entirely off your shoulders so you can actually enjoy your life. If you want to dive deeper into building these streamlined digital habits, having access to high-quality digital assets can speed up your workflow immensely. The less time you spend looking for resources, the more time you spend creating.
Silent Channel Killers: Editing Traps You Keep Falling Into
It breaks my heart to see so many brilliant people give up on their social media dreams. They share incredibly helpful advice, but their content gets completely ignored because of silly technical mistakes. When you repeatedly fall into these editing traps, the platform assumes your content is bad and stops showing it to strangers.
The most common trap is what I call the "Motion Sickness Effect" caused by over-editing. When beginners discover the transition menu in their software, they suddenly want to use every single spinning, zooming, and flashing effect available. They think adding these wild animations will make the video look highly expensive and engaging.
In reality, throwing too many visual effects at a viewer just confuses their brain and makes the message hard to follow. It is like dumping an entire jar of spicy pepper into a nice bowl of soup. Instead of making it better, you completely ruin the actual flavor of what you were trying to serve.
You should always rely on clean, hard cuts for ninety percent of your project. Only use a special visual transition when you are changing the subject entirely or moving to a completely new location. Keep your editing invisible so the viewer focuses entirely on your words.
The "Too Cool for Rules" Mentality
Another massive mistake is ignoring the visual aesthetics of the graphics you overlay on the screen. Some creators refuse to follow proper lighting rules when using green screens or generated backgrounds. But if you want to look professional, you should always stop ruining your AI art and avoid lighting mistakes before putting those visuals in your video.
Many creators also fall into the trap of ignoring their audience retention graphs completely. They just post the video and immediately move on to the next idea without checking the performance data. But those little graphs tell you exactly where people got bored and swiped away.
If you notice a massive drop in viewership at the five-second mark, something is wrong with your hook. If you see people leaving during the middle, your pacing is probably way too slow. Studying these audience retention metrics is the only way to actually understand what your viewers want from you.
When you ignore these numbers, you end up repeating the exact same mistakes for months without seeing any real growth. This easily leads to the dreaded "200 View Jail," where none of your posts ever reach a larger audience. Do not let your pride stop you from analyzing your failures and adjusting your editing style.
The Danger of Visual Inconsistency
Your followers will naturally begin to recognize your specific style, color palette, and editing rhythm. If you randomly change your entire visual setup every single day, you confuse your most loyal fans. They might scroll right past your video because it does not instantly look like something you would make.
You must choose a specific brand identity and stick to it strictly across all your short-form videos. Use the exact same font for your captions, the same color grading style, and a familiar greeting. If you use custom avatars or mascots, learning how to master AI character consistency will keep your brand looking sharp.
Your Blueprint for Digital Domination
Editing videos for mobile screens is not just a technical task; it is a completely new language you have to learn. Like any new language, you will probably feel awkward and slow when you first try to speak it. You will make clumsy cuts, your audio might slightly echo, and you might accidentally hide your text behind a share button.
But every single time you open that editing timeline, you are building muscle memory that will last a lifetime. You now know how to frame your shots safely and why sound design is your invisible weapon. You understand that respecting the viewer's time with fast pacing is the ultimate secret to social media growth.
The tools will constantly change, and the algorithms will always find new ways to test our patience. However, the basic psychology of human attention will always remain exactly the same. If you can provide massive value without wasting a single second of screen time, you will absolutely win.
I know exactly how scary it feels to stare at a blank timeline, wondering if anyone will actually care about what you have to say. My very first videos were an absolute disaster, and I constantly questioned if I was just wasting my time. But I promise you, if you stick to these simple rules, your audience will eventually find you, and all this hard work will pay off beautifully.
Common Questions About Vertical Video Editing
Do I really need a powerful computer to edit my videos?
Absolutely not! The smartphones we carry in our pockets today are incredibly powerful and capable of handling multiple video tracks with ease. Many of the top creators on the internet completely rely on free mobile apps to cut, color, and export their daily content.
How long should my short videos actually be?
The perfect length entirely depends on the story you are trying to tell your audience. If you can deliver a strong tip in fifteen seconds, do not drag it out just to make it longer. However, if your story naturally takes fifty seconds to explain, keep it engaging and the viewers will gladly stay.
Why does my video quality drop so badly after I upload it?
This usually happens because you are exporting your file in a resolution that is way too large, like 4K. Social media apps compress heavy files aggressively, which completely destroys the sharpness of your footage. Stick to exporting in standard 1080p resolution and always ensure the "high-quality uploads" option is turned on in your app settings.
How do I get better ideas for the background b-roll I use?
You can search through high-quality free stock platforms like Pexels Video Directory to find aesthetic clips, or you can create highly specific images using clever text prompts. If you choose the creative route, decoding generative AI and the science behind prompts will help you instantly generate the exact scene you need.
Is it better to use native app editors or third-party software?
Native app editors are great for adding trending music or specific platform stickers right before you post. But for the actual cutting, pacing, and detailed audio work, third-party mobile applications offer much more control and precision. You get a cleaner workspace without the constant distraction of your social media feed.
Disclaimer: The strategies and tips shared in this article are for educational and informational purposes only. Social media algorithms, features, and content policies change frequently. We cannot guarantee specific view counts, follower growth, or monetization results. Always ensure your content complies with the official community guidelines of the specific platforms (such as Facebook, Instagram, TikTok, or Pinterest) you are posting on. We are not responsible for any account penalties resulting from the misuse of these editing techniques.