The Hidden Frustration of Communicating with Machines
You know that feeling when you have a brilliant picture in your head, but the AI gives you a mutant character with seven fingers instead? Yeah, I have been there too. Let's skip the complicated coding talk today. I am going to show you exactly how to talk to your AI image generator so you get the perfect picture you want, right on the very first try.
Imagine sitting down at your computer with a brilliant idea in your head. You type out exactly what you want into your favorite text-to-image tool. You press enter, wait a few seconds, and your heart drops.
The result looks absolutely nothing like what you imagined. The characters have too many fingers, the background is a messy blur, and the overall vibe is completely wrong.
You try again. You add more words, but the picture just gets messier and more confusing. This daily struggle leaves many smart, creative people feeling completely stuck and overwhelmed.
Let's look at why you might be failing to find a reliable solution and how bad information makes things worse:
- Overcomplicated tutorials: Most online guides use heavy coding terms. This just confuses beginners and makes the learning curve feel impossible.
- The "magic word" myth: People waste hours searching for secret keywords. In reality, these magical cheats simply do not exist.
- Conversational mistakes: We naturally write like we are speaking to a human friend. But an algorithm requires a completely different, structured approach to process information.
- Information overload: With thousands of self-proclaimed experts sharing conflicting advice, you never know which method actually works.
My 30-Second AI Image Master Checklist
- Always put your main character or object at the very front of your sentence.
- Pick one specific style (like "oil painting" or "macro photography") and stick to it.
- Use simple commas to separate your background, lighting, and camera details.
- Never mix two clashing styles together unless you want a weird, messy picture.
My Personal Punctuation Cheat Sheet
Let's break down exactly which punctuation marks do what in your prompts. I keep this exact table taped to my monitor!
Building a Solid Foundation: The Mechanics of Machine Understanding
Now that we understand the deep frustration, let's fix it. Generating beautiful digital art is never about pure luck or random guessing.
It is entirely about speaking the right language. You need to understand how the system actually reads your text.
Think of the computer algorithm as a highly skilled but completely blind painter. This painter has memorized millions of pictures. However, they cannot read your mind.
If you ask this painter for "a nice house," they might paint a tiny wooden cabin or a massive modern mansion. You have to specify every single detail if you want a specific outcome.
I am going to walk you through a highly effective, logical blueprint. You can apply these exact steps today to see immediate improvements in your results.
Step 1: The Subject-First Rule
The most common mistake people make is burying their main idea in the middle of a long sentence. Algorithms read your text from left to right.
The words placed at the very beginning of your sentence carry the most mathematical weight. This means the system pays the most attention to your first few words.
Always start your command with your main character, object, or central focus. Do not start with background details or camera angles.
Real-Life Scenario:
Imagine you want a picture of a golden retriever playing in a park during autumn.
Bad Approach: "It is a beautiful autumn day in the park with orange leaves everywhere and there is a golden retriever running around."
Good Approach: "A golden retriever running, autumn park background, orange leaves everywhere."
By putting the dog first, you force the system to prioritize the animal before it worries about the leaves or the weather.
Myth vs Reality: Writing Instructions
The Myth You Hear The Scientific Reality Use full, grammatically perfect sentences. Algorithms prefer clear, comma-separated keywords and short phrases. Add "please" and "thank you" to get better results. The system ignores polite filler words. They waste valuable space. More words always equal a better picture. Too many conflicting words confuse the system. Clarity beats length.
For the longest time, my biggest mistake was writing huge paragraphs because I honestly thought more words would give me a better picture. Once I realized the software stops paying attention after the first few phrases, I started keeping my commands super short and direct. This simple realization completely changed everything for me, and my artwork instantly looked so much more professional.
Step 2: Defining the Artistic Medium and Style
Once you have your subject, you must tell the system how you want the final piece to look. Without a defined medium, the software will just guess.
Sometimes it will guess a photograph. Other times, it might give you an oil painting or a cartoon. You must take control of this decision.
Are you looking for a photorealistic image? Do you want a 3D cartoon style? Or maybe a watercolor painting?
Actionable Advice:
Add a specific medium descriptor right after your main subject.
If you want a photograph, use words like "Photorealistic," "Captured on 35mm lens," or "Documentary photography."
If you want art, use terms like "Digital illustration," "Oil painting," or "Concept art."
Let's combine this with our previous example.
Instead of just "A golden retriever," we now write: "A photorealistic portrait of a golden retriever, captured on a DSLR camera, autumn park background."
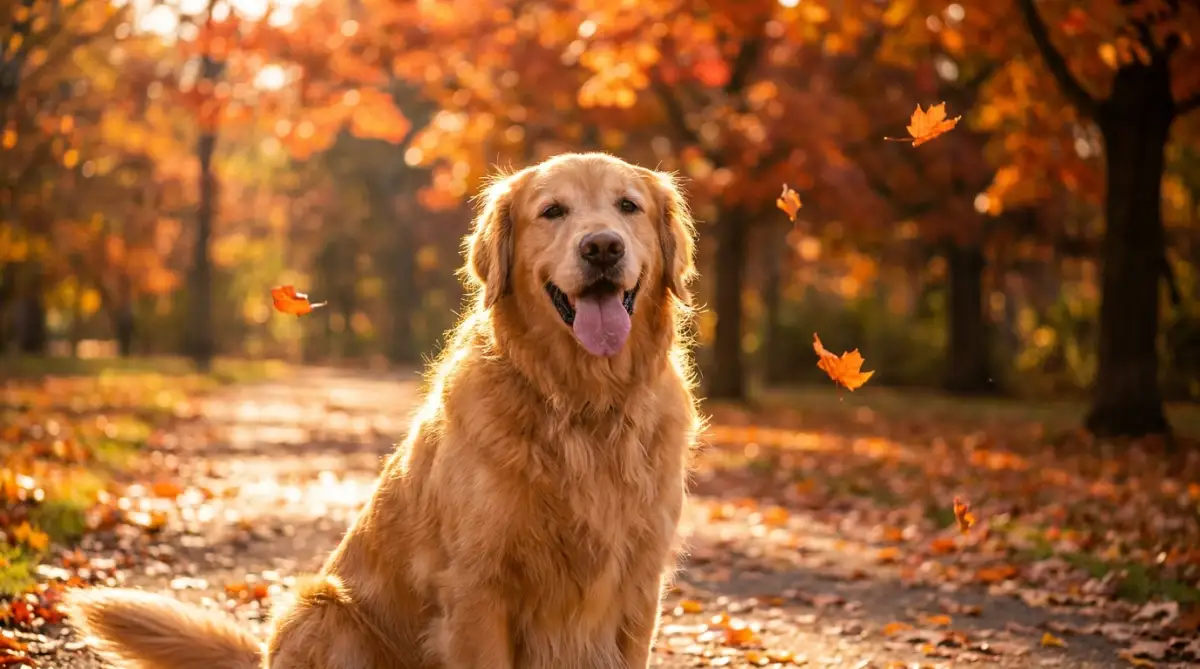
Instantly, your results will shift from random artistic guesses to a highly specific, professional-looking photograph.
The Power of Detailed Modifiers
Now we need to talk about modifiers. Modifiers are descriptive adjectives that add flavor, emotion, and texture to your base idea.
Without modifiers, an image can look flat and boring. Modifiers act as the seasoning in your recipe. They bring the whole concept together perfectly.
However, you must use them logically. Throwing random adjectives into your text will only create a chaotic mess.
Group your modifiers by category. Think about textures, emotions, and specific colors.
For example, instead of saying "a nice car," you should describe it as "a sleek, metallic sports car, glossy red finish, aggressive design."
This gives the machine very specific data points to reference from its training library. It knows exactly what "glossy" and "metallic" look like.
Step 3: Mastering the Art of Lighting
If there is one secret weapon in this entire process, it is lighting. Lighting completely dictates the mood and professionalism of your final result. A poorly lit subject looks cheap and fake. A beautifully lit subject looks like a masterpiece created by a professional.
Most beginners completely ignore lighting instructions. They leave it up to the machine, which usually defaults to very flat, basic daylight.
You can dramatically improve your output by simply adding two or three lighting keywords at the end of your instructions.
Expert Insight:
Different lighting setups create entirely different emotional responses.
- Want something dramatic and moody? Use "Cinematic lighting, high contrast, shadows."
- Want a clean, professional product shot? Use "Studio lighting, soft box, brightly lit."
- Want a magical, glowing effect? Use "Bioluminescent, golden hour, rim lighting."
Let's look at our golden retriever example one more time. We are going to add our lighting instructions to the end.
The Evolving Formula: "A photorealistic portrait of a golden retriever, captured on a DSLR camera, autumn park background. Golden hour lighting, warm sun rays, soft rim light."
By the way, if you are not a photography expert, you might wonder why I use terms like "golden hour." In photography, the Golden hour is that brief window of time right after sunrise or right before sunset when daylight is incredibly soft and warm. AI models love this term because it instantly guarantees a beautiful, warm glow on your subject.
Notice how we built this logically? We started with the subject. We defined the style. We set the scene. Finally, we painted it with light.
This step-by-step layering is exactly how professional creators achieve consistent, breathtaking results every single time.
Understanding Negative Framing
Sometimes, the best way to get what you want is by telling the machine exactly what you do not want. This is a highly effective technique known as negative framing.
Many modern tools have a dedicated section for negative instructions. If your tool does not, you can sometimes add negative weights to your text directly.
Why is this necessary? Because the software naturally tries to fill empty spaces with whatever it thinks fits best.
If you are generating a picture of a lonely desert, the system might randomly add a camel or a cactus because those things often appear in desert photos.
If you absolutely do not want a cactus, you have to explicitly forbid it. Using negative framing helps clean up your final piece. Common negative keywords include: "ugly, blurry, deformed, extra limbs, watermark, text."
Real Talk: Do massive negative prompts actually work?
Question: Should I just paste a massive block of 50 negative words I found on Reddit?
My Answer: Please don't! I tried that last year, and it actually made my images look flat and boring. Keep your negative words limited to exactly what you are seeing in your bad generations. If the AI keeps adding random words to your picture, just use "--no text". Keep it short and simple!
By stripping away the bad elements, you force the algorithm to focus all its computing power on making your main subject look as perfect as possible.
The Real-World Application
Let's actually test this out with a fake project so you can see exactly how I do it. Imagine you run a small bakery and you need a mouth-watering image for your new menu.
You want a picture of a chocolate cake.
If you just type "a chocolate cake," you will likely get a very basic, unappetizing cartoon or a messy photo. This will not help your business at all.
Let's apply our structural rules to build a professional command.
Subject: A slice of rich, dark chocolate fudge cake on a white ceramic plate.
Medium: Macro food photography, highly detailed, sharp focus.
Environment: Dark wooden table background, subtle steam rising.
Lighting: Dramatic studio lighting, soft backlighting, warm tones.
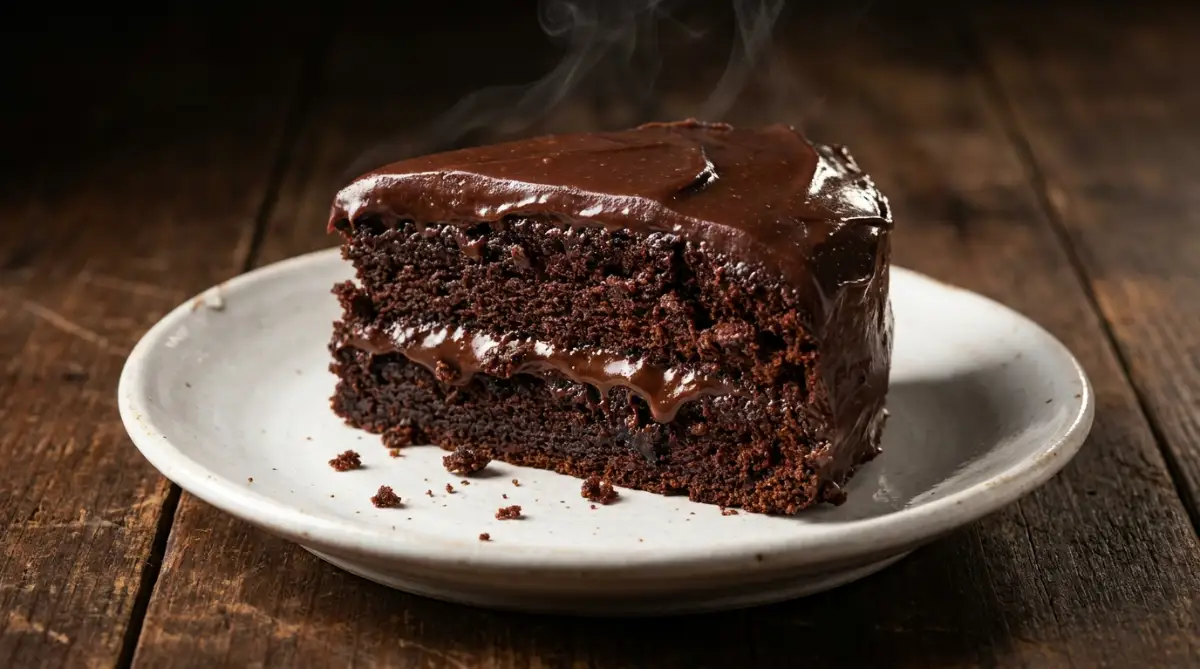
When you combine these elements, your text becomes: "A slice of rich dark chocolate fudge cake on a white ceramic plate, macro food photography, highly detailed. Dark wooden table background, subtle steam rising. Dramatic studio lighting, soft backlighting, warm tones."
The difference in quality will be absolute night and day. You went from asking for a random doodle to directing a professional photo shoot.
This is the true power of structural planning. You are no longer hoping for a good result. You are actively engineering one.
We have covered the foundational mechanics of how these systems read your words. But building a basic structure is only the first part of the journey.
To truly master this skill, you need to understand how to blend complex ideas and troubleshoot when things go wrong. We will explore advanced combination techniques next.
Taking Total Control: The Hidden Settings Professionals Use
Mastering the basic structure of a command is an excellent start. However, if you want to create truly breathtaking visuals, you have to step behind the curtain.
The most successful digital creators do not just write words. They use specific mathematical parameters to control the machine's behavior. Think of these parameters as the hidden dials and switches on a professional camera.
Before you start experimenting with wild ideas, you must identify exactly what you need. It is much like the step-by-step process of learning how to identify your exact skin type at home for zero cost. Without knowing your baseline foundation, you will end up wasting resources on the wrong solutions entirely.
Let's explore how you can take complete control over your creative process.
Pro Tip: I highly recommend watching the short video right below before you read the next section. Seeing the actual screen recordings makes the written steps make sense instantly.
If you want to see exactly how these secret settings look in action, watch this quick video tutorial below before reading the rest of the guide. It will show you exactly where to find these hidden dials so the upcoming steps make perfect sense!
Manipulating the Aspect Ratio
By default, most generation tools give you a perfect square image. Squares are great for simple profile pictures, but they are terrible for storytelling.
A square simply cannot capture the wide beauty of a mountain range. It also struggles to show the tall, imposing height of a modern skyscraper. You need to tell the system exactly what shape your canvas should be.
In tools like Midjourney, you can add a simple command at the very end of your text. Typing "--ar 16:9" tells the machine to create a wide, cinematic image. This is perfect for desktop wallpapers or YouTube thumbnails.
If you want to dig deeper into these specific commands without getting lost in fake tutorials, I highly suggest keeping the Official Midjourney Documentation Hub bookmarked. It is completely free, always updated, and directly from the creators of the software.
Directing the Camera Like a Filmmaker
Words like "beautiful" or "stunning" are entirely subjective. The algorithm does not truly understand what you find beautiful.
Instead of using vague adjectives, you should speak the language of professional photography. Tell the software exactly what kind of camera lens it should simulate.
Real-Life Scenario:
Imagine you want a picture of an old man with deep wrinkles on his face.
If you just type "a close up of an old man," the result will be average. But if you type "an extreme close-up portrait of an elderly man, shot on 85mm lens, f/1.8 aperture," everything changes.
The system understands that an 85mm lens with a low aperture creates a sharp subject with a beautifully blurred background.
Understanding basic photography composition techniques helps you command the algorithm far more effectively. You start getting results that look like they belong in a premium magazine.
Here are a few camera angles you can test today:
- Macro photography: Perfect for extreme details, like a water drop on a leaf.
- Drone view / Bird's eye view: Excellent for showing massive cities or sprawling forests.
- Low angle shot: Makes your main character look powerful, heroic, and dominating.
- Security camera footage: Creates a gritty, realistic, and highly atmospheric vibe.
The Magic of Seed Values for Consistency
One of the biggest complaints beginners have is a lack of consistency. You generate a character you absolutely love, but you can never get the system to draw that exact same person again.
Every time you hit enter, the software uses a random "seed" number to generate the static noise that forms your picture. If you do not tell it otherwise, it picks a new random number every single time.
You can actually find out what seed number the machine used for your favorite picture. Once you have that specific number, you can attach it to your future commands.
By locking in the seed number, you force the algorithm to start from the exact same mathematical starting point. This is the ultimate secret to creating consistent characters for comic books or graphic novels.
Controlling the Chaos
Did you know you can tell the machine how creative it is allowed to be? Some platforms have a specific setting called "Chaos" or "Stylize".
If you set the chaos level very low, the software will follow your text perfectly. It will not take any artistic liberties. This is excellent when you need a very precise, literal interpretation of your words.
However, if you feel creatively stuck, you can crank the chaos level up. The machine will start throwing in random colors, wild angles, and unexpected artistic flairs.
It is like telling a human artist, "Here is my basic idea, now go wild and surprise me." Adjusting this single setting can completely break through your creative blocks.
Quick Q&A: Controlling AI Chaos
Q: Will turning up the "Chaos" setting ruin my picture?
A: Not always! I love using high chaos when I am totally out of ideas. It gives you wild, unexpected angles. Just keep it low when you need a highly accurate result.
Q: Do I need to learn coding to use these hidden settings?
A: Absolutely not. You just type simple commands like "--ar 16:9" at the end of your text. It is as easy as typing a hashtag on social media.

The Hidden Traps Destroying Your Digital Art
Even with the best tools and formulas, things can still go horribly wrong. Many intelligent people fall into the same predictable traps when they first start interacting with artificial intelligence.
These bad habits do not just ruin your pictures. They actively drain your energy and your wallet.
Most premium generation tools require a paid subscription. Mindless clicking burns through your paid usage limits incredibly fast.
Running out of fast generation credits can bring your creative work to a dead stop. If you use these tools for work, wasting your limited credits on bad prompts literally costs you money. Let's fix that right now.
Let's break down the most expensive and frustrating mistakes you need to avoid.
The "Word Soup" Disaster
The single most common mistake is over-prompting. People think that if they add 100 different adjectives, the image will look 100 times better.
They type things like: "A cat, beautiful, stunning, amazing, 8k, highly detailed, masterpiece, trending on artstation, gorgeous, perfect."
This is known as the word soup disaster.
The machine only has a limited amount of memory for each request. It typically only pays attention to the first 60 to 75 words you type.
If you fill those valuable spots with meaningless filler words like "amazing" or "masterpiece," you push out the actual important details. The software gets confused, gives up, and generates a messy, blurry image.
Keep your commands lean, highly specific, and entirely focused on physical details rather than subjective opinions.
The Word Soup Test: See the Difference
- The Rookie Mistake (Too messy): "A beautiful, stunning, gorgeous, amazing, 8k resolution, masterpiece, trending on artstation photo of a cat." (Result: The AI ignores the cat and focuses on making a blurry "masterpiece" background).
- The Pro Move (Clean and direct): "A fluffy orange tabby cat sitting on a windowsill, morning sunlight, sharp focus." (Result: A perfect, highly detailed picture of a cat).
Clashing Artistic Styles
Another massive pitfall is demanding two completely opposite styles in the same sentence.
You cannot ask the system for a "photorealistic 3D cartoon." A photograph and a cartoon are two entirely different mediums.
When you combine conflicting instructions, the algorithm tries to merge them. The result is often a terrifying, unnatural image that looks deeply unsettling.
Pick one single artistic direction and stick to it completely. If you want a watercolor painting, use words related to paper texture and brush strokes. Do not mix in camera terminology.
According to various machine learning experts and tech reviewers, providing conflicting data points is the fastest way to break an algorithm's logical processing.
Quick Guide: Mixing Styles the Right Way
Ignoring the Power of Punctuation
Many beginners write their instructions as one massive, breathless run-on sentence. They completely ignore commas, periods, and colons.
The algorithm reads punctuation as a highly important separator. A comma acts as a soft break, telling the machine that a new idea is starting.
Without Punctuation: "A red car driving in the rain dark moody lighting wet road."
With Punctuation: "A red car driving in the rain, dark moody lighting, wet road."
That simple addition of commas completely changes how the system processes the request. It mathematically separates the subject from the lighting and the environment.
Never underestimate the power of basic grammar formatting. It is the cheapest and easiest way to instantly upgrade your visual outputs.
The "Frankenstein" Artist Blend
It is very common to use famous artists' names to guide the style of your picture. Typing "in the style of Vincent van Gogh" is a great way to get beautiful, swirling brush strokes.
The mistake happens when people try to combine five different artists at the same time.
If you ask for an image in the style of Van Gogh, Picasso, Leonardo da Vinci, and a modern anime artist, the system crashes emotionally.
It rips pieces from each distinct style and sews them together into a chaotic mess. We call this the Frankenstein effect.
Limit yourself to one or maximum two artist references. This keeps the final composition looking cohesive, intentional, and highly professional.
Your Blueprint for the Next 24 Hours
You now possess a deeply powerful understanding of how these creative algorithms actually function. You are no longer guessing in the dark.
You understand how to structure your requests logically, how to manipulate the camera settings, and exactly which common traps to actively avoid.
The Immediate Action Checklist
- Task 1: The One-Subject Rule. Open your favorite tool today and generate three images using only a single subject and a defined medium. No background details allowed yet. Master the basics first.
- Task 2: The Lighting Test. Take your best result from Task 1 and generate it three more times. Change only the lighting keyword each time (e.g., cinematic, golden hour, neon). Watch how the mood completely transforms.
- Task 3: The Negative Cleanse. Add negative commands to remove one specific element you hate seeing in your generated pictures.
Stop being intimidated by a blank text box. The machine is waiting for your instructions. It is ready to help you bring your wildest, most beautiful ideas into reality.
Take a deep breath, type out your newly structured command, and watch the magic happen right before your eyes. You have got this!
I promise that once you start practicing these simple steps, that heavy feeling of frustration will completely disappear. I went from wanting to smash my keyboard to actually having fun bringing my ideas to life every single day. Go open your favorite image tool right now, try just one of these tips, and see how amazing your next picture turns out!
Disclaimer: The information provided in this article is for educational and informational purposes only. Results from artificial intelligence tools may vary based on software updates, subscription tiers, and platform-specific guidelines. Always review the terms of service of any software you choose to use.
Have you tried any of these tips yet? I would love to know which trick worked best for your latest project. Also, if you want to learn how to make money selling these amazing images you just created, check out my other guide on starting your digital art business today!